- ConnectorGenerator
- Table of contents
- Introduction
- Features
- Used libraries
- Using the ConnectorGenerator VSCode extension
- Contributing
Hi 👋
If you're looking to create a new target connector for HelloID provisioning and don't know where to start, you're in the right place.
This ConnectorGenerator extension for VSCode is the perfect starting point for building out your new connector, with all the essential resources you'll need to get started.
If you're a new to the templates and the ConnectorGenerator refer to the QuickStart to help you get started.
| Feature | Remarks |
|---|---|
| Create a new target connector for HelloID provisioning. | Enables users to generate a HelloID connector with predefined scaffolding. |
| PowerShell code snippets. | Provides reusable PowerShell code snippets to streamline development. |
| Detect variables holding sensitive information. | Scans PowerShell scripts for potential secrets and warns the user. This feature is enabled by default. |
| Code highligting for HelloID specific variables. | highlighting for HelloID variables like $actionContext and $outputContext in .ps1 files. This feature is enabled by default. |
| Advanced error diagnostics. | Error diagnostics for unassigned Invoke-RestMethod and Invoke-WebRequest calls in PowerShell scripts. |
| Adding connector templates files. | Add connector templates files using the context menu allowing you to easy extend an already existing connector. |
| Change the FieldMapping systemGUID to the systemName. | Allows you to easy change the systemGUID to the systemName. |
| Development features | Enables development features. Useful when making changes to the templates. This feature is disabled by default. |
The following libraries are used in this extension:
| Library | Version | URL |
|---|---|---|
| Axios | 1.7.7 |
https://www.npmjs.com/package/axios |
- Open the command palette by clicking on
View -> Command paletteor pressctrl+shift+p(cmd+shift+pon mac). - Search for
Create new HelloID connector project scaffolding. - Select the connector type
target. - Enter a name for the connector.
- Browse to the location where you want the files to be created and press
enter.
Only available when a new file (can be of any type) is opened.
- Right click to open the context menu.
- Click on
ConnectorGenerator -> Create new HelloID connector project scaffolding. - Select the connector type
target. - Enter a name for the connector.
- Browse to the location where you want the files to be created and press
enter.
The source connector templates are currently not available.
When creating a new connector based of the template, the latest release will be downloaded from: https://github.com/Tools4everBV/HelloID-Conn-Prov-Target-V2-Template/releases. The zip file will be unpacked and saved to in user folder using the latest release version as the folderName.
- Windows:
C:\Users\<username>\<vscode-version>\extensions\connectorteam.connectorgenerator-<version>/cache - macOS:
~/.vscode/extensions/connectorteam.connectorgenerator-<version>/cache - Linux:
~/.vscode/extensions/connectorteam.connectorgenerator-<version>/cache
The latest will only be donwloaded in case the locally cached version is older then the latest version available on GitHub.
From version 1.2.0 Code snippets can be retrieved directly from the context menu: ConnectorGenerator -> Retrieve code snippets or from the command palette. Code snippets are retrieved from our helper repository on GitHub and cached locally in your user directory.
- Windows:
C:\Users\<username>\<vscode-version>\extensions\connectorteam.connectorgenerator-<version>/cache/snippets.json - macOS:
~/.vscode/extensions/connectorteam.connectorgenerator-<version>/cache/snippets.json - Linux:
~/.vscode/extensions/connectorteam.connectorgenerator-<version>/cache/snippets.json
In order to use a code snippet:
- Select a snippet from the list and click the arrow button to expand.
- Click
Copyto copy the snippet to the clipboard.
The snippets cache can only be updated manually by clicking: Refresh snippet cache from the status bar.
To prevent uploading secrets ConnectorGenerator actively scans for variables that might contain sensitive information. Potentially unsafe variables will marked red to make them stand out.
To disable this feature:
- Open the VSCode settings windows by clicking on:
ctrl + ,or (cmd + ,on macOs). - Type:
connectorgeneratorto go to the section for this extension. - Make sure to toggle:
Enable Secret Scanning.
HelloID specific variables like $actionContext and $outputContext can be highlighted. Hovering above the variable will display an information window and containing the link to documentation.
To enable this feature:
- Open the VSCode settings windows by clicking on:
ctrl + ,or (cmd + ,on macOs). - Type:
connectorgeneratorto go to the section for this extension. - Make sure to toggle:
Enable HelloID variable highlight.
With PowerShell, most cmdlets write their output to the output stream. However, in HelloID this is not supported as all output should be written to the $outputContext. Therefore, cmdlets like Invoke-RestMethod should always be assigned to a variable or outputted to $null. The ConnectorGenerator checks cmdlets for potential unwanted output in the output stream.
Currently, this feature cannot be disabled.
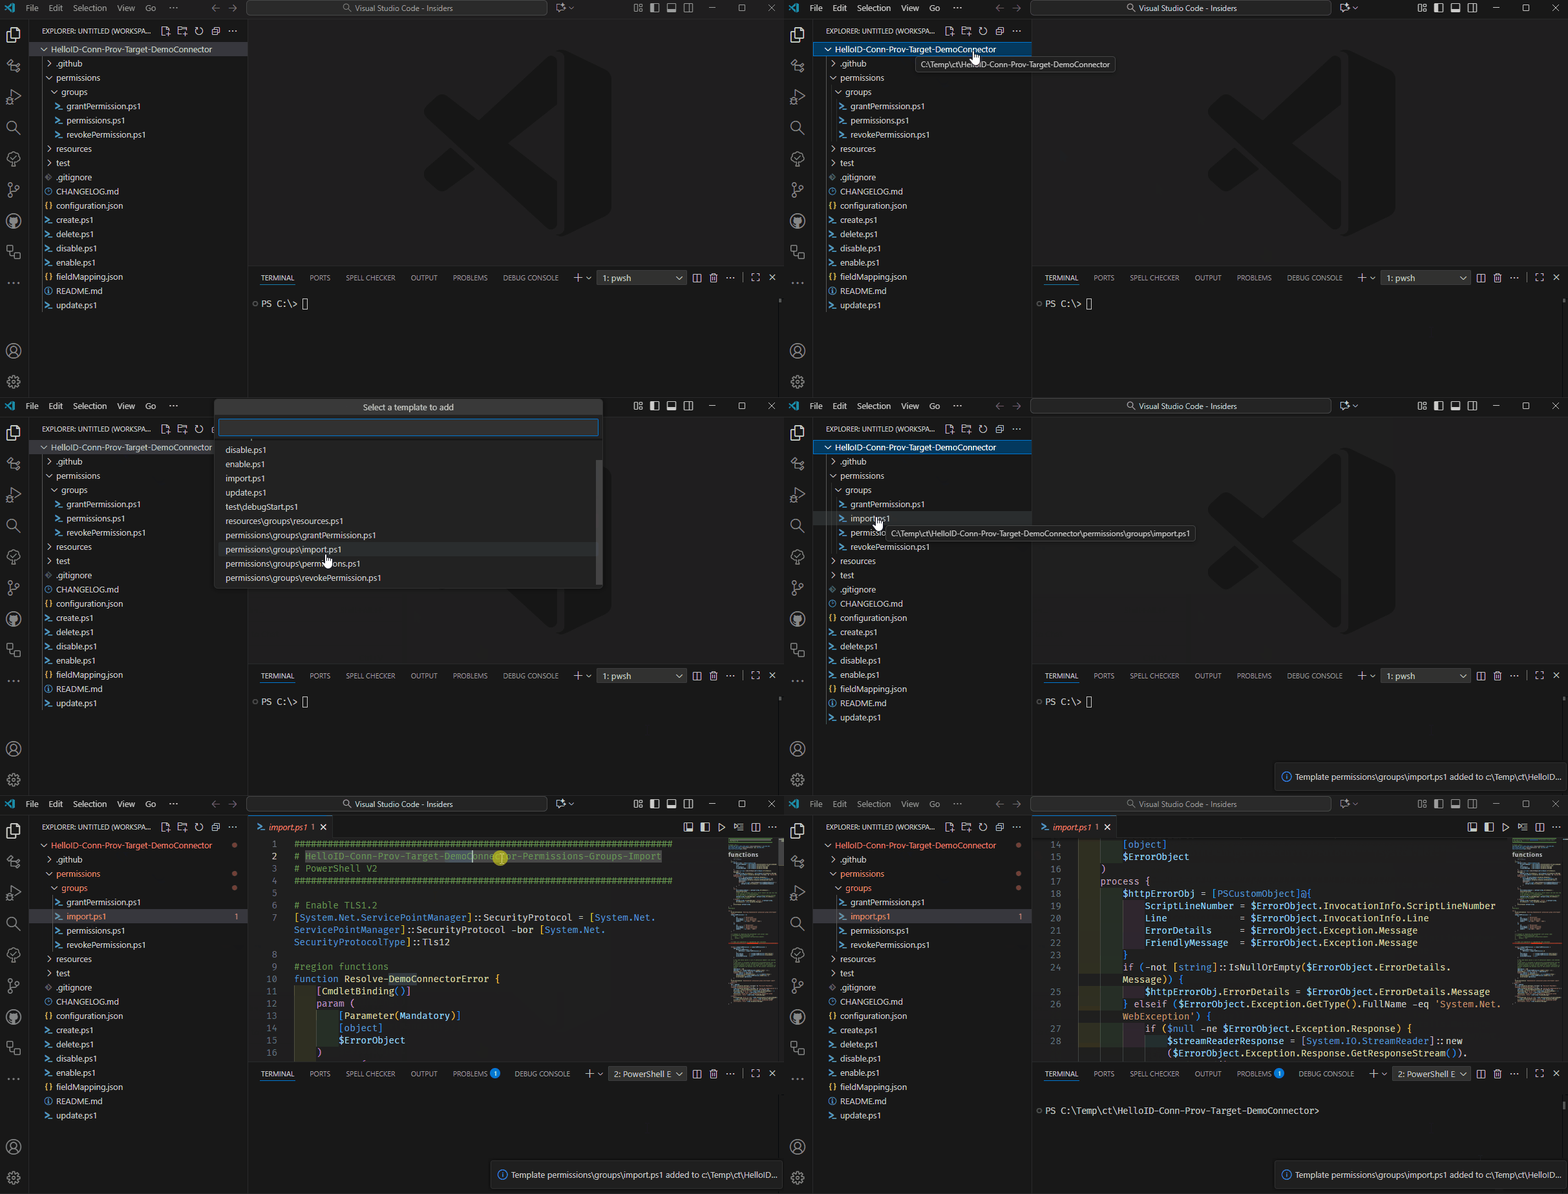
From version 2.3.0 its possible to add connector templates files using the context menu allowing you to easy extend an already existing connector.
To add a template file:
- In the explorer window, click right to open the context menu.
- Select
add connector template file. - Select the template you wish to add.
Missing folders will automatically be created!
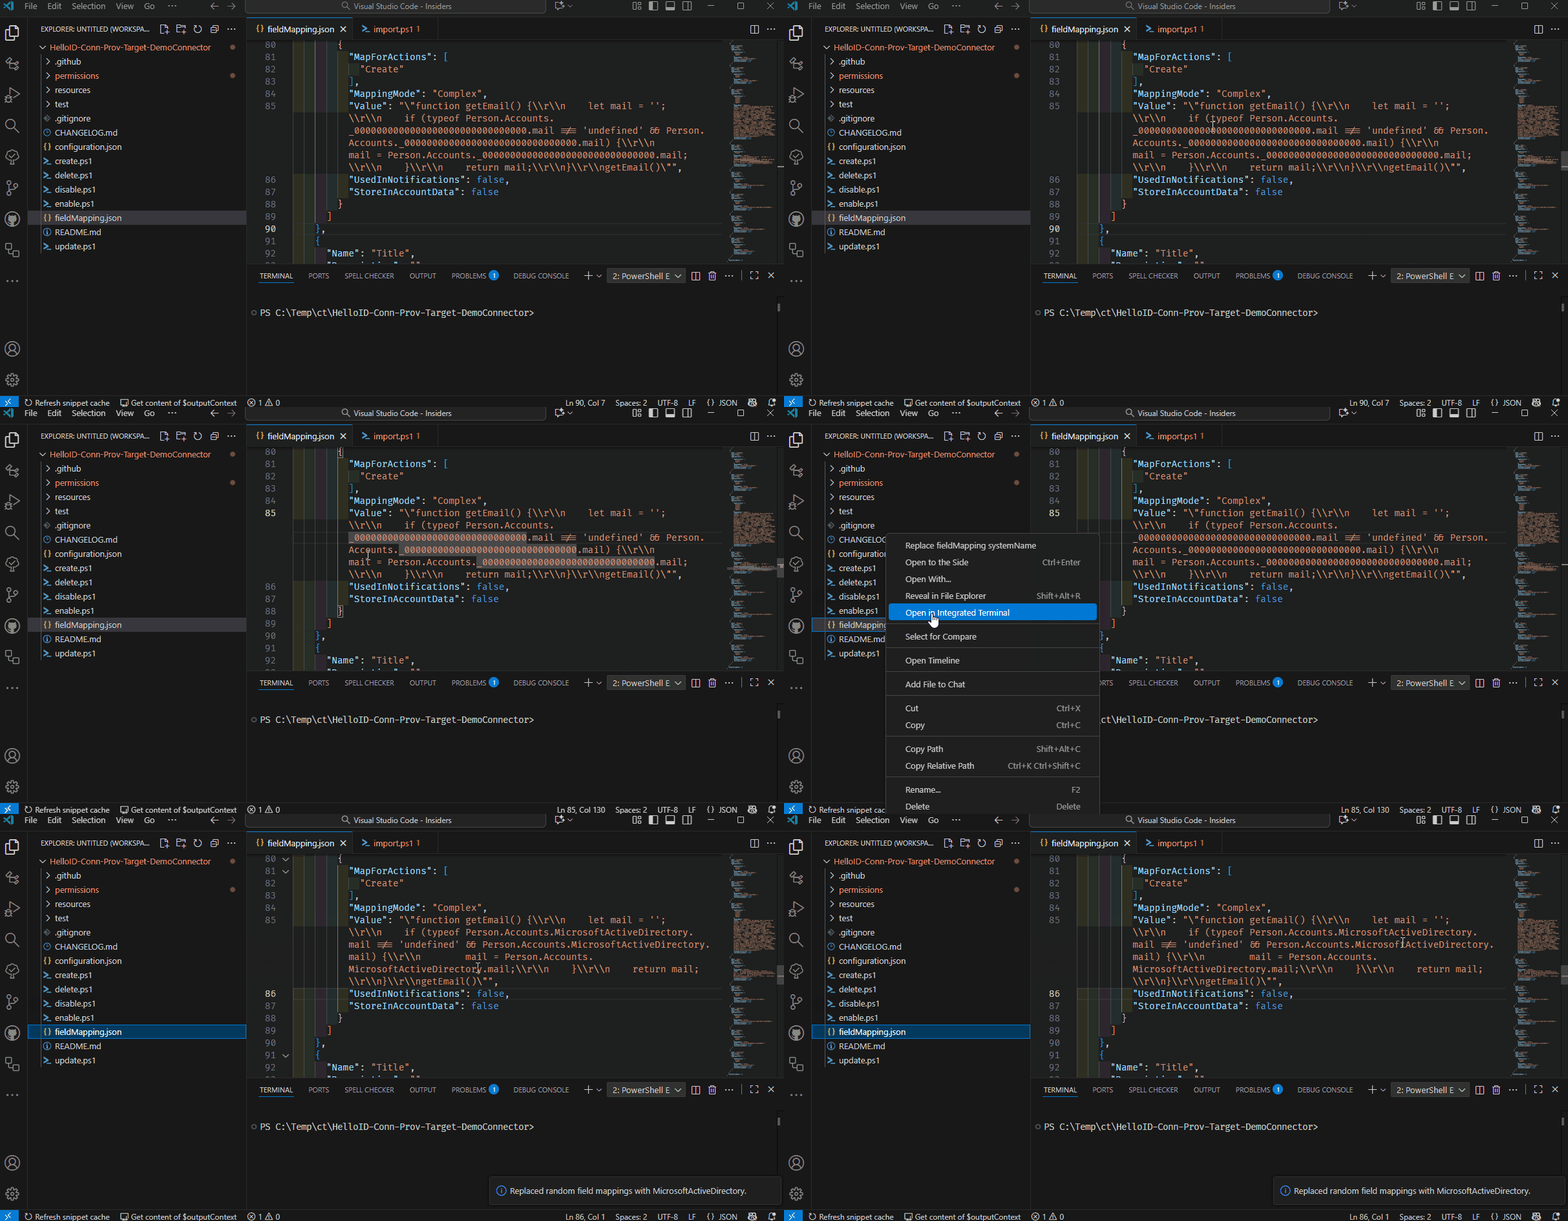
If you're fieldmapping uses account data from other systems, when exported, the JSON contains a GUID instead of the system name. This will manually need to be resolved. To make this easier, the extension provides the option to change the GUID to the system name.
- In the explorer window, select the
fieldMapping.json. - Right to open the context menu.
- Select
replace field mapping system name.
Currently, only the
MicrosoftActiveDirectorysystem name is supported.
If you wish to extend or modify the template, you can do so by creating a new folder in the cache folder. Make sure the name of the new folder adheres to semver.
To create a connector based of your updated version:
- Open the VSCode settings windows by clicking on:
ctrl + ,or (cmd + ,on macOs). - Type:
connectorgeneratorto go to the section for this extension. - Make sure to toggle:
Enable Version Selection For Development Purposes.
This will enable two features:
- Quikly open the cache folder from the status bar by clicking on:
Open cache folder. - Option to select a template version when you create a new connector.
Note that, with this feature
enablednew templates will not be downloaded from the GitHub repository. Instead, the local cache is always used as the primary source.
If you have an idea or suggestion for improving the ConnectorGenerator VSCode extension, one of the best ways to get involved is by opening up an issue on GitHub repository.
🪲
To submit a new issue, navigate to the Issues tab on the repository page and click the New Issue button. Describe the issue in as much detail as possible, including any error messages or steps to reproduce the issue. This will help the development team to diagnose and fix the problem.
🚀
To request a new feature, create a new issue using the same process as for a bug report. Be sure to describe the feature you would like to see added, and explain how it would improve your experience.


