| Package | Version |
|---|---|
affise-attribution-lib |
 |
- Affise Attribution React Native Library
- Description
- Features
- ProviderType identifiers collection
- Event send control
- Events tracking
- Custom events tracking
- Predefined event parameters
- Events buffering
- Advertising Identifier (google) tracking
- Open Advertising Identifier (huawei) tracking
- Install referrer tracking
- Push token tracking
- Uninstall tracking
- APK preinstall tracking
- Links
- Offline mode
- Disable tracking
- Disable background tracking
- Get random user Id
- Get Affice device Id
- Get providers
- Is first run
- Get referrer
- Get referrer value
- Referrer keys
- Get module status
- Platform specific
- SDK to SDK integrations
- Debug
- Troubleshoots
Affise SDK is a software you can use to collect app usage statistics, device identifiers, deeplink usage, track install referrer.
Xcode14.2+iOS12+Android24+
This is a Node.js module available through the npm registry.
Installation using npm
npm install affise-attribution-libInstallation using yarn
yarn add affise-attribution-libAdd modules to Android project
| Module | Version |
|---|---|
ADVERTISING |
 |
ANDROIDID |
 |
APPSFLYER |
 |
LINK |
 |
NETWORK |
 |
PHONE |
 |
STATUS |
 |
SUBSCRIPTION |
 |
RUSTORE |
 |
HUAWEI |
 |
META |
 |
TIKTOK |
 |
Example example/android/app/build.gradle
final affise_version = '1.6.66'

dependencies {
    // Affise modules
    implementation "com.affise:module-advertising:$affise_version"
    implementation "com.affise:module-androidid:$affise_version"
    implementation "com.affise:module-link:$affise_version"
    implementation "com.affise:module-network:$affise_version"
    implementation "com.affise:module-phone:$affise_version"
    implementation "com.affise:module-status:$affise_version"
    implementation "com.affise:module-subscription:$affise_version"
    implementation "com.affise:module-meta:$affise_version"
    implementation "com.affise:module-rustore:$affise_version"
    implementation "com.affise:module-huawei:$affise_version"
    implementation "com.affise:module-appsflyer:$affise_version"
    implementation "com.affise:module-tiktok:$affise_version"
}Add modules to iOS project
| Module | Version |
|---|---|
ADSERVICE |
1.6.57 |
ADVERTISING |
1.6.57 |
APPSFLYER |
1.6.57 |
LINK |
1.6.57 |
PERSISTENT |
1.6.57 |
STATUS |
1.6.57 |
SUBSCRIPTION |
1.6.57 |
TIKTOK |
1.6.57 |
Example example/ios/Podfile
target 'YourAppProject' do
  # ...

  affise_version = '1.6.57'
  # Affise Modules
  pod 'AffiseModule/AdService', affise_version
  pod 'AffiseModule/Advertising', affise_version
  pod 'AffiseModule/AppsFlyer', affise_version
  pod 'AffiseModule/Link', affise_version
  pod 'AffiseModule/Persistent', affise_version
  pod 'AffiseModule/Status', affise_version
  pod 'AffiseModule/Subscription', affise_version
  pod 'AffiseModule/TikTok', affise_version
endGet list of installed modules:
Affise.module.getModulesInstalled().then((modules) => {
    console.log(`Modules: ${modules}`);
});To manually stop modules from starting use Affise.settings.setDisableModules:
Affise
    .settings({
        affiseAppId: 'Your appId',
        secretKey: 'Your SDK secretKey',
    })
    .setDisableModules([
        // Exclude modules from start
        AffiseModules.ADVERTISING,
        AffiseModules.SUBSCRIPTION,
    ])
.start(); // Start Affise SDKiOS 14.3+
Sends attributionToken from AdServices framework AAAttribution.attributionToken() to Affise server
Caution
🟥🟥🟥🟥🟥🟥🟥🟥🟥🟥🟥🟥🟥🟥🟥
iOS only
Advertising Module starting Manually
🟥🟥🟥🟥🟥🟥🟥🟥🟥🟥🟥🟥🟥🟥🟥
Affise.module.advertising.startModule()Caution
🟥🟥🟥🟥🟥🟥🟥🟥🟥🟥🟥🟥🟥🟥🟥
iOS only
Module Advertising requires NSUserTrackingUsageDescription key in info.plist
Application will crash if key not present
🟥🟥🟥🟥🟥🟥🟥🟥🟥🟥🟥🟥🟥🟥🟥
This module required to Use IDFA (Identifier for advertisers)
Open info.plist and add key NSUserTrackingUsageDescription with string value. For more information read requirements
Send AppsFlyer event data to Affise
//AppsFlyer event data
const eventName = "af_add_to_wishlist"
const eventValues = {
  af_price: 1234.56,
  af_content_id: "1234567",
};
// Send AppsFlyer event
appsFlyer.logEvent(
  eventName,
  eventValues,
  (res) => console.log(res),
  (err) => console.error(err)
);
// Send AppsFlyer data to Affise
Affise.module.appsflyer.logEvent(eventName, eventValues);
Is Module present:
Affise.module.appsflyer.hasModule().then((hasModule) => {
    // Check is module present
})Caution
🟥🟥🟥🟥🟥🟥🟥🟥🟥🟥🟥🟥🟥🟥🟥
Use Android Huawei Module to get OAID (Open Advertising Identifier)
🟥🟥🟥🟥🟥🟥🟥🟥🟥🟥🟥🟥🟥🟥🟥
Affise.getProviders().then((providers) => {
    const oaid = providers[ProviderType.OAID];
});Return last url in chan of redirection
🟥Support MAX 10 redirections🟥
Affise.module.link.resolve("SITE_WITH_REDIRECTION", (redirectUrl) => {
    // handle redirect url
});
Is Module present:
Affise.module.link.hasModule().then((hasModule) => {
    // Check is module present
})- Add
queriesto yourAndroidManifest.xml
<?xml version="1.0" encoding="utf-8"?>
<manifest xmlns:android="http://schemas.android.com/apk/res/android">
    <queries>
        <package android:name="com.facebook.katana" />
        <package android:name="com.instagram.android" />
        <package android:name="com.facebook.lite" />
    </queries>

    <application>
      ...
    </application>
</manifest>- Add your
Facebook App Idas config valueAffiseConfig.FB_APP_IDinAffise.settings
Affise
  .settings({
      affiseAppId: 'Your appId', //Change to your app id
      secretKey: 'Your SDK secretKey', //Change to your SDK secretKey
  })
  .setConfigValue(AffiseConfig.FB_APP_ID, "Your Facebook App Id")
.start(); // Start Affise SDKiOS Only
Note
Module requires user phone to be authenticated by Apple ID
It uses Apple Security framework to store protected information in user account
Persist device id value for Get random device Id on application reinstall
Caution
🟥🟥🟥🟥🟥🟥🟥🟥🟥🟥🟥🟥🟥🟥🟥
If getStatus return an error or working more than 2 minutes
Please see section validation credentials
🟥🟥🟥🟥🟥🟥🟥🟥🟥🟥🟥🟥🟥🟥🟥
Affise.module.getStatus(AffiseModules.STATUS, (response) => {
    // handle status response
});Get products by ids:
const ids = ["exampple.product.id_1", "exampple.product.id_2"];

Affise.module.subscription.fetchProducts(ids, (result) => {
    if (result.isSuccess) {
        const value = result.asSuccess;
        const products: AffiseProduct[] = value.products;
        const invalidIds: string[] = value.invalidIds;
    } else {
        const error: string = result.asFailure;
    }
});
Purchase product:
// Specify product type for correct affise event
Affise.module.subscription.purchase(product, AffiseProductType.CONSUMABLE, (result) => {
    if (result.isSuccess) {
        const purchasedInfo: AffisePurchasedInfo = result.asSuccess;
    } else {
        const error: string = result.asFailure;
    }
});
Is Module present:
Affise.module.subscription.hasModule().then((hasModule) => {
    // Check is module present
})CONSUMABLENON_CONSUMABLERENEWABLE_SUBSCRIPTIONNON_RENEWABLE_SUBSCRIPTION
Caution
🟥🟥🟥🟥🟥🟥🟥🟥🟥🟥🟥🟥🟥🟥🟥
There are no official React Native TikTok package.
You have to add native dependency manually.
Add the Android TikTok SDK dependency TikTok Docs
Add the iOS TikTok SDK dependency TikTok Docs
🟥🟥🟥🟥🟥🟥🟥🟥🟥🟥🟥🟥🟥🟥🟥
let eventName = "AddToCart";
let eventId = "eventId";

let properties = {
  "currency": "USD",
  "value": 4.99,
  "contents": [
    {
      "price": "4.99",
      "quantity": "1",
      "content_name": "Name of the product",
      "brand": "Brand of the product"
    }
  ],
};

// Send TikTok data to Affise
Affise.module.tikTok.sendEvent(eventName, properties, eventId);
Is Module present:
Affise.module.tikTok.hasModule().then((hasModule) => {
    // Check is module present
})After dependency is added, and project is sync with npm install and initialize.
Demo app App.tsx
import {
  Affise,
  AffiseInitProperties
} from 'affise-attribution-lib';


export default function App() {

    React.useEffect(() => {
        Affise
            .settings({
                affiseAppId: 'Your appId', //Change to your app id
                secretKey: 'Your SDK secretKey', //Change to your SDK secretKey
            })
            .start(); // Start Affise SDK
    });

    return (
        <SafeAreaView>
        </SafeAreaView>
    );
}Check Affise library initialization
Affise
  .settings({
    affiseAppId: "Your appId",
    secretKey: "Your SDK secretKey",
  })
  .setOnInitSuccess(() => {
    // Called if library initialization succeeded
    console.log(`Affise: init success`);
  })
  .setOnInitError((error) => {
    // Called if library initialization failed
    console.log(`Affise: init error ${error}`);
  })
.start(); // Start Affise SDKCaution
🟥🟥🟥🟥🟥🟥🟥🟥🟥🟥🟥🟥🟥🟥🟥
Please make sure your credentials are valid
Visit section validation credentials
🟥🟥🟥🟥🟥🟥🟥🟥🟥🟥🟥🟥🟥🟥🟥
Set SDK server domain:
Affise
    .settings({
        affiseAppId: 'Your appId',
        secretKey: 'Your SDK secretKey',
    })
    .setDomain("https://YoureCustomDomain/") // Set custom domain
.start(); // Start Affise SDKMinimal Android SDK version is 21
For a minimal working functionality your app needs to declare internet permission:
<manifest>
    <uses-permission android:name="android.permission.INTERNET"/>
</manifest>
OAID certificate in your project (Optional)
example/android/app/src/main/assets/oaid.cert.pem
Affise Advertising module uses AppTrackingTransparency framework to get advertisingIdentifier
For working functionality your app needs to declare NSUserTrackingUsageDescription permission:
Open XCode project info.plist and add key NSUserTrackingUsageDescription with string value
Example info.plist:
<plist version="1.0">
<dict>
    ...
	<key>NSUserTrackingUsageDescription</key>
	<string>Youre permission text</string>
</dict>Some methods require to return same data on application reinstall
It is achieved by using Affise Persistent Module for iOS and Affise AndroidId Module for Android
Such SDK methods are:
To simulate multiple device install for testing purpose you can use one of two options:
- Disable module dependencies:
iOS
# Disable module dependency
# pod 'AffiseModule/Persistent', affise_version
Android
// Disable module dependency
// implementation("com.affise:module-androidid:$affise_version")- Disable module programmatically:
Affise
    .settings({
        affiseAppId: 'Your appId',
        secretKey: 'Your SDK secretKey',
    })
    .setDisableModules([
        AffiseModules.PERSISTENT, // Disable module programmatically for iOS
        AffiseModules.ANDROIDID, // Disable module programmatically for Android
    ])
.start();Note
Read more about Persistent data
There are two working mode for Affice device Id:
- Return persistent value on each reinstall
- Return new value on each reinstall
First mode require:
- Enabling Affise Persistent Module for
iOS
# Enable module dependency
pod 'AffiseModule/Persistent', affise_version- Enabling Affise AndroidId Module for
Android
// Enable module dependency
implementation("com.affise:module-androidid:$affise_version")
Even after deleting application Affice device Id will be preserved and will restore on next installation
Second mode is convenient for testing. By removing dependency or disabling module programmatically, a new Affice device Id will be generated for each new installation.
To match users with events and data library is sending, these ProviderType identifiers are collected:
AFFISE_APP_IDAFFISE_PKG_APP_NAMEAFF_APP_NAME_DASHBOARDAPP_VERSIONAPP_VERSION_RAWSTORETRACKER_TOKENTRACKER_NAMEFIRST_TRACKER_TOKENFIRST_TRACKER_NAMELAST_TRACKER_TOKENLAST_TRACKER_NAMEOUTDATED_TRACKER_TOKENINSTALLED_TIMEFIRST_OPEN_TIMEINSTALLED_HOURFIRST_OPEN_HOURINSTALL_FIRST_EVENTINSTALL_BEGIN_TIMEINSTALL_FINISH_TIMEREFERRER_INSTALL_VERSIONREFERRAL_TIMEREFERRER_CLICK_TIMEREFERRER_CLICK_TIME_SERVERREFERRER_GOOGLE_PLAY_INSTANTCREATED_TIMECREATED_TIME_MILLICREATED_TIME_HOURUNINSTALL_TIMEREINSTALL_TIMELAST_SESSION_TIMECPU_TYPEHARDWARE_NAMEDEVICE_MANUFACTURERDEEPLINK_CLICKDEVICE_ATLAS_IDAFFISE_DEVICE_IDAFFISE_ALT_DEVICE_IDREFTOKENREFTOKENSREFERRERUSER_AGENTMCCODEMNCODEREGIONCOUNTRYLANGUAGEDEVICE_NAMEDEVICE_TYPEOS_NAMEPLATFORMSDK_PLATFORMAPI_LEVEL_OSAFFISE_SDK_VERSIONOS_VERSIONRANDOM_USER_IDAFFISE_SDK_POSTIMEZONE_DEVAFFISE_EVENT_NAMEAFFISE_EVENT_TOKENLAST_TIME_SESSIONTIME_SESSIONAFFISE_SESSION_COUNTLIFETIME_SESSION_COUNTAFFISE_DEEPLINKAFFISE_PART_PARAM_NAMEAFFISE_PART_PARAM_NAME_TOKENAFFISE_APP_TOKENLABELAFFISE_SDK_SECRET_IDUUIDAFFISE_APP_OPENEDPUSHTOKENPUSHTOKEN_SERVICEAFFISE_EVENTS_COUNTAFFISE_SDK_EVENTS_COUNTAFFISE_METRICS_EVENTS_COUNTAFFISE_INTERNAL_EVENTS_COUNTIS_ROOTEDIS_EMULATOR
AD_SERVICE_ATTRIBUTION
GAID_ADIDGAID_ADID_MD5ADIDALTSTR_ADIDFIREOS_ADIDCOLOROS_ADID
ANDROID_IDANDROID_ID_MD5
OAIDOAID_MD5
META
MAC_SHA1MAC_MD5CONNECTION_TYPEPROXY_IP_ADDRESS
NETWORK_TYPEISP
There are two ways to send events
- Cache event to later scheduled send in batch
AddToCartEvent()
.send();- Send event right now
AddToCartEvent()
    .sendNow(() => {
        // handle event send success
    }, (status) => {
        // handle event send failed
        // 🟥Warning🟥: event is NOT cached for later send
});Demo app DefaultEventsFactory.ts
For example, we want to track what items usually user adds to shopping cart. To send event first create it with following code
import { Affise, AddToCartEvent } from 'affise-attribution-lib';

class Presenter {
  onUserAddsItemsToCart(item: string) {
    const items = {
      items: 'cookies, potato, milk',
    };

    new AddToCartEvent({
        userData: item,
        timeStampMillis: Date.now()
    })
        .addPredefinedString(PredefinedString.DESCRIPTION, 'groceries')
        .addPredefinedObject(PredefinedObject.CONTENT, items)
        .send();
  }
}
With above example you can implement other events:
AchieveLevelAddPaymentInfoAddToCartAddToWishlistAdRevenueClickAdvCompleteRegistrationCompleteStreamCompleteTrialCompleteTutorialContactContentItemsViewCustomizeProductDeepLinkedDonateFindLocationInitiateCheckoutInitiatePurchaseInitiateStreamInviteLastAttributedTouchLeadListViewLoginOpenedFromPushNotificationOrderOrderItemAddedOrderItemRemoveOrderCancelOrderReturnRequestOrderReturnRequestCancelPurchaseRateReEngageReserveSalesScheduleSearchShareSpendCreditsStartRegistrationStartTrialStartTutorialSubmitApplicationSubscribeTravelBookingUnlockAchievementUnsubscribeUpdateViewAdvViewCartViewContentViewItemViewItemsInitialSubscriptionInitialTrialInitialOfferConvertedTrialConvertedOfferTrialInRetryOfferInRetrySubscriptionInRetryRenewedSubscriptionFailedSubscriptionFromRetryFailedOfferFromRetryFailedTrialFromRetryFailedSubscriptionFailedOfferiseFailedTrialReactivatedSubscriptionRenewedSubscriptionFromRetryConvertedOfferFromRetryConvertedTrialFromRetryUnsubscription
Use any of custom events if default doesn't fit your scenario:
CustomId01CustomId02CustomId03CustomId04CustomId05CustomId06CustomId07CustomId08CustomId09CustomId10
If above event functionality still limits your usecase, you can use UserCustomEvent
new UserCustomEvent({eventName: "MyCustomEvent"})
.send();To enrich your event with another dimension, you can use predefined parameters for most common cases. Add it to any event:
import {
  Affise,
  AddToCartEvent,
  PredefinedString,
  PredefinedObject,
} from 'affise-attribution-lib';

class Presenter {
  onUserAddsItemsToCart(item: string) {
    const items = {
      items: 'cookies, potato, milk',
    };

    new AddToCartEvent({
        userData: item,
    })
        .addPredefinedString(PredefinedString.DESCRIPTION, 'best before 2029')
        .addPredefinedObject(PredefinedObject.CONTENT, items)
        .send();
  }
}
In examples above PredefinedString.DESCRIPTION and PredefinedObject.CONTENT is used, but many others is available:
| PredefinedParameter | Type |
|---|---|
| PredefinedString | string |
| PredefinedLong | bigint |
| PredefinedFloat | number |
| PredefinedObject | Record<string, unknown> |
| PredefinedListObject | Array<Record<string, unknown>> |
| PredefinedListString | Array<string> |
ACHIEVEMENT_IDADREV_AD_TYPEBRANDBRICKCAMPAIGN_IDCATALOGUE_IDCHANNEL_TYPECITYCLASSCLICK_IDCONTENT_IDCONTENT_NAMECONTENT_TYPECONVERSION_IDCOUNTRYCOUPON_CODECURRENCYCUSTOMER_SEGMENTCUSTOMER_TYPECUSTOMER_USER_IDDEEP_LINKDESCRIPTIONDESTINATION_ADESTINATION_BDESTINATION_LISTEVENT_NAMENEW_VERSIONNETWORKOLD_VERSIONORDER_IDPARAM_01PARAM_02PARAM_03PARAM_04PARAM_05PARAM_06PARAM_07PARAM_08PARAM_09PARAM_10PAYMENT_INFO_AVAILABLEPIDPLACEMENTPREFERRED_NEIGHBORHOODSPRODUCT_IDPRODUCT_NAMEPURCHASE_CURRENCYRECEIPT_IDREGIONREGISTRATION_METHODREVIEW_TEXTSEARCH_STRINGSEGMENTSOURCESTATUSSUBSCRIPTION_IDSUCCESSSUGGESTED_DESTINATIONSSUGGESTED_HOTELSTUTORIAL_IDUNITUTM_CAMPAIGNUTM_MEDIUMUTM_SOURCEVALIDATEDVERTICALVIRTUAL_CURRENCY_NAMEVOUCHER_CODE
AMOUNTDATE_ADATE_BDEPARTING_ARRIVAL_DATEDEPARTING_DEPARTURE_DATEHOTEL_SCORELEVELMAX_RATING_VALUENUM_ADULTSNUM_CHILDRENNUM_INFANTSPREFERRED_NUM_STOPSPREFERRED_STAR_RATINGSQUANTITYRATING_VALUERETURNING_ARRIVAL_DATERETURNING_DEPARTURE_DATESCORETRAVEL_STARTTRAVEL_ENDUSER_SCOREEVENT_STARTEVENT_END
PREFERRED_PRICE_RANGEPRICEREVENUELATLONG
CONTENT
CONTENT_LIST
CONTENT_IDS
Affise library will send any pending events with first opportunity, but if there is no network connection or device is disabled, events are kept locally for 7 days before deletion.
Note
Requires Affise Advertising Module
Advertising Identifier (google) tracking is supported automatically, no actions needed
Note
Requires Affise Huawei Module
Open Advertising Identifier is supported automatically, no actions needed
Install referrer tracking is supported automatically, no actions needed
To let affise track push token you need to receive it from your push service provider, and pass to Affise library.
Supported service providers:
APPLE- iOS onlyFIREBASE
For swift edit AppDelegate.swift
import AffiseAttributionLib
class AppDelegate ... {

  ...

  override func application(
    _ application: UIApplication,
    didRegisterForRemoteNotificationsWithDeviceToken deviceToken: Data
  ) {
    let pushToken = deviceToken.map { String(format: "%02.2hhx", $0) }.joined()

    // Pass APNs token to Affise
    Affise.addPushToken(pushToken, .APPLE)
  }
}
For Objective-C edit AppDelegate.mm
#import <AffiseAttributionLib/AffiseAttributionLib-Swift.h>

- (void)application:(UIApplication*)application didRegisterForRemoteNotificationsWithDeviceToken:(NSData*)devToken
{
	// parse token bytes to string
	const char *data = (char *)[devToken bytes];
	NSMutableString *token = [NSMutableString string];
	for (NSUInteger i = 0; i < [devToken length]; i++)
	{
		[token appendFormat:@"%02.2hhX", data[i]];
	}

  [Affise addPushTokenWithPushToken:[token copy] service:APPLE];
}@react-native-firebase/app
@react-native-firebase/messaging
Add Firebase integration by completing steps in React Native Firebase Docs
After you have done with firebase integration, setup Messaging
import { Affise, PushTokenService } from 'affise-attribution-lib';
import firebase from '@react-native-firebase/app';
import messaging from '@react-native-firebase/messaging';

async function firebaseSetup() {
    const credentials = {
        appId: '',
        projectId: '',
        // ...
    };
    await firebase.initializeApp(credentials);
}

function getToken() {
    messaging().getToken().then((fcmToken) => {
        Affise.addPushToken(fcmToken, PushTokenService.FIREBASE);
    });
}After you have done with firebase integration, get APNs token from firebase
import { Affise, PushTokenService } from 'affise-attribution-lib';
import { Platform } from 'react-native';
import messaging from '@react-native-firebase/messaging';

function getToken() {
    if (Platform.OS == 'ios') {
        messaging().getAPNSToken().then((apnsToken) => {
            if (!apnsToken) return
            Affise.addPushToken(apnsToken, PushTokenService.APPLE);
        });
    }
}Affise automatically track reinstall events by using silent-push technology, to make this feature work, pass push token when it is recreated by user and on you application starts up
Affise.addPushToken(token);SDK is also supports scenario when APK is installed not from one of application markets, such as google play, huawei appgallery or amazon appstore
To use this feature, create file with name partner_key in your app assets directory, and write unique identifier inside, this key will be passed to our backend so you can track events by partner later in your Affise console.
Caution
🟥🟥🟥🟥🟥🟥🟥🟥🟥🟥🟥🟥🟥🟥🟥
Deeplinks support only CUSTOM scheme NOT http or https
For http or https read how to setup AppLinks
🟥🟥🟥🟥🟥🟥🟥🟥🟥🟥🟥🟥🟥🟥🟥
To integrate deeplink support you need:
-
Register deeplink callback right after
Affise.settings({affiseAppId, secretKey}).start()
Affise.registerDeeplinkCallback((value) => {
    // full uri "scheme://host/path?parameters"
    const deeplink = value.deeplink;

    // separated for convenience
    const scheme = value.scheme;
    const host = value.host;
    const path = value.path;
    const queryParametersMap = value.parameters;

    if((queryParametersMap["<your_uri_key>"] || []).includes("<your_uri_key_value>")) {
        // handle value
    }
});
Test Android DeepLink via terminal command:
adb shell am start -a android.intent.action.VIEW -d "YOUR_SCHEME://YOUR_DOMAIN/somepath?param=1\&list=some\&list=other\&list="
Test iOS DeepLink via terminal command:
xcrun simctl openurl booted "YOUR_SCHEME://YOUR_DOMAIN/somepath?param=1&list=some&list=other&list=1"
To integrate deeplink support in android you need:
-
Add intent filter to one of your activities
AndroidManifest.xml example -
Add custom scheme (NOT
httporhttps) and host to filter
Example: YOUR_SCHEME://YOUR_DOMAIN
Example: myapp://mydomain.com
<intent-filter android:autoVerify="true">
    <action android:name="android.intent.action.VIEW" />

    <category android:name="android.intent.category.DEFAULT" />
    <category android:name="android.intent.category.BROWSABLE" />

    <data
        android:host="YOUR_DOMAIN"
        android:scheme="YOUR_SCHEME" />
</intent-filter>To integrate deeplink support in iOS you need:
- Add deeplink handler React Docs.
example AppDelegate.mm
- (BOOL)application:(UIApplication *)application openURL:(NSURL *)url
  sourceApplication:(NSString *)sourceApplication annotation:(id)annotation
{
  return [RCTLinkingManager application:application openURL:url
                      sourceApplication:sourceApplication annotation:annotation];
}- Add key
CFBundleURLTypestoInfo.plistexample Info.plist
Example: YOUR_SCHEME://YOUR_DOMAIN
Example: myapp://mydomain.com
<key>CFBundleURLTypes</key>
<array>
    <dict>
        <key>CFBundleTypeRole</key>
        <string>Editor</string>
        <key>CFBundleURLName</key>
        <string>YOUR_DOMAIN</string>
        <key>CFBundleURLSchemes</key>
        <array>
            <string>react</string>
        </array>
    </dict>
</array>Caution
🟥🟥🟥🟥🟥🟥🟥🟥🟥🟥🟥🟥🟥🟥🟥
You must owne website domain.
And has ability to add file https://yoursite/.well-known/apple-app-site-association for iOS support
And has ability to add file https://yoursite/.well-known/assetlinks.json for Android support
🟥🟥🟥🟥🟥🟥🟥🟥🟥🟥🟥🟥🟥🟥🟥
To integrate applink support in android you need:
-
Add intent filter to one of your activities
AndroidManifest.xml example -
Add
httpsorhttpscheme and host to filter
Example: https://YOUR_DOMAIN
Example: https://mydomain.com
<intent-filter android:autoVerify="true">
    <action android:name="android.intent.action.VIEW" />

    <category android:name="android.intent.category.DEFAULT" />
    <category android:name="android.intent.category.BROWSABLE" />

    <data
        android:host="YOUR_DOMAIN"
        android:scheme="https" />
</intent-filter>-
Associate your app with your website. Read Google instructions
How To Associate your app with your website
After setting up URL support for your app, the App Links Assistant generates a Digital Assets Links file you can use to associate your website with your app.
As an alternative to using the Digital Asset Links file, you can associate your site and app in Search Console.
If you're using Play App Signing for your app, then the certificate fingerprint produced by the App Links Assistant usually doesn't match the one on users' devices. In this case, you can find the correct Digital Asset Links JSON snippet for your app in your Play Console developer account under Release > Setup > App signing.
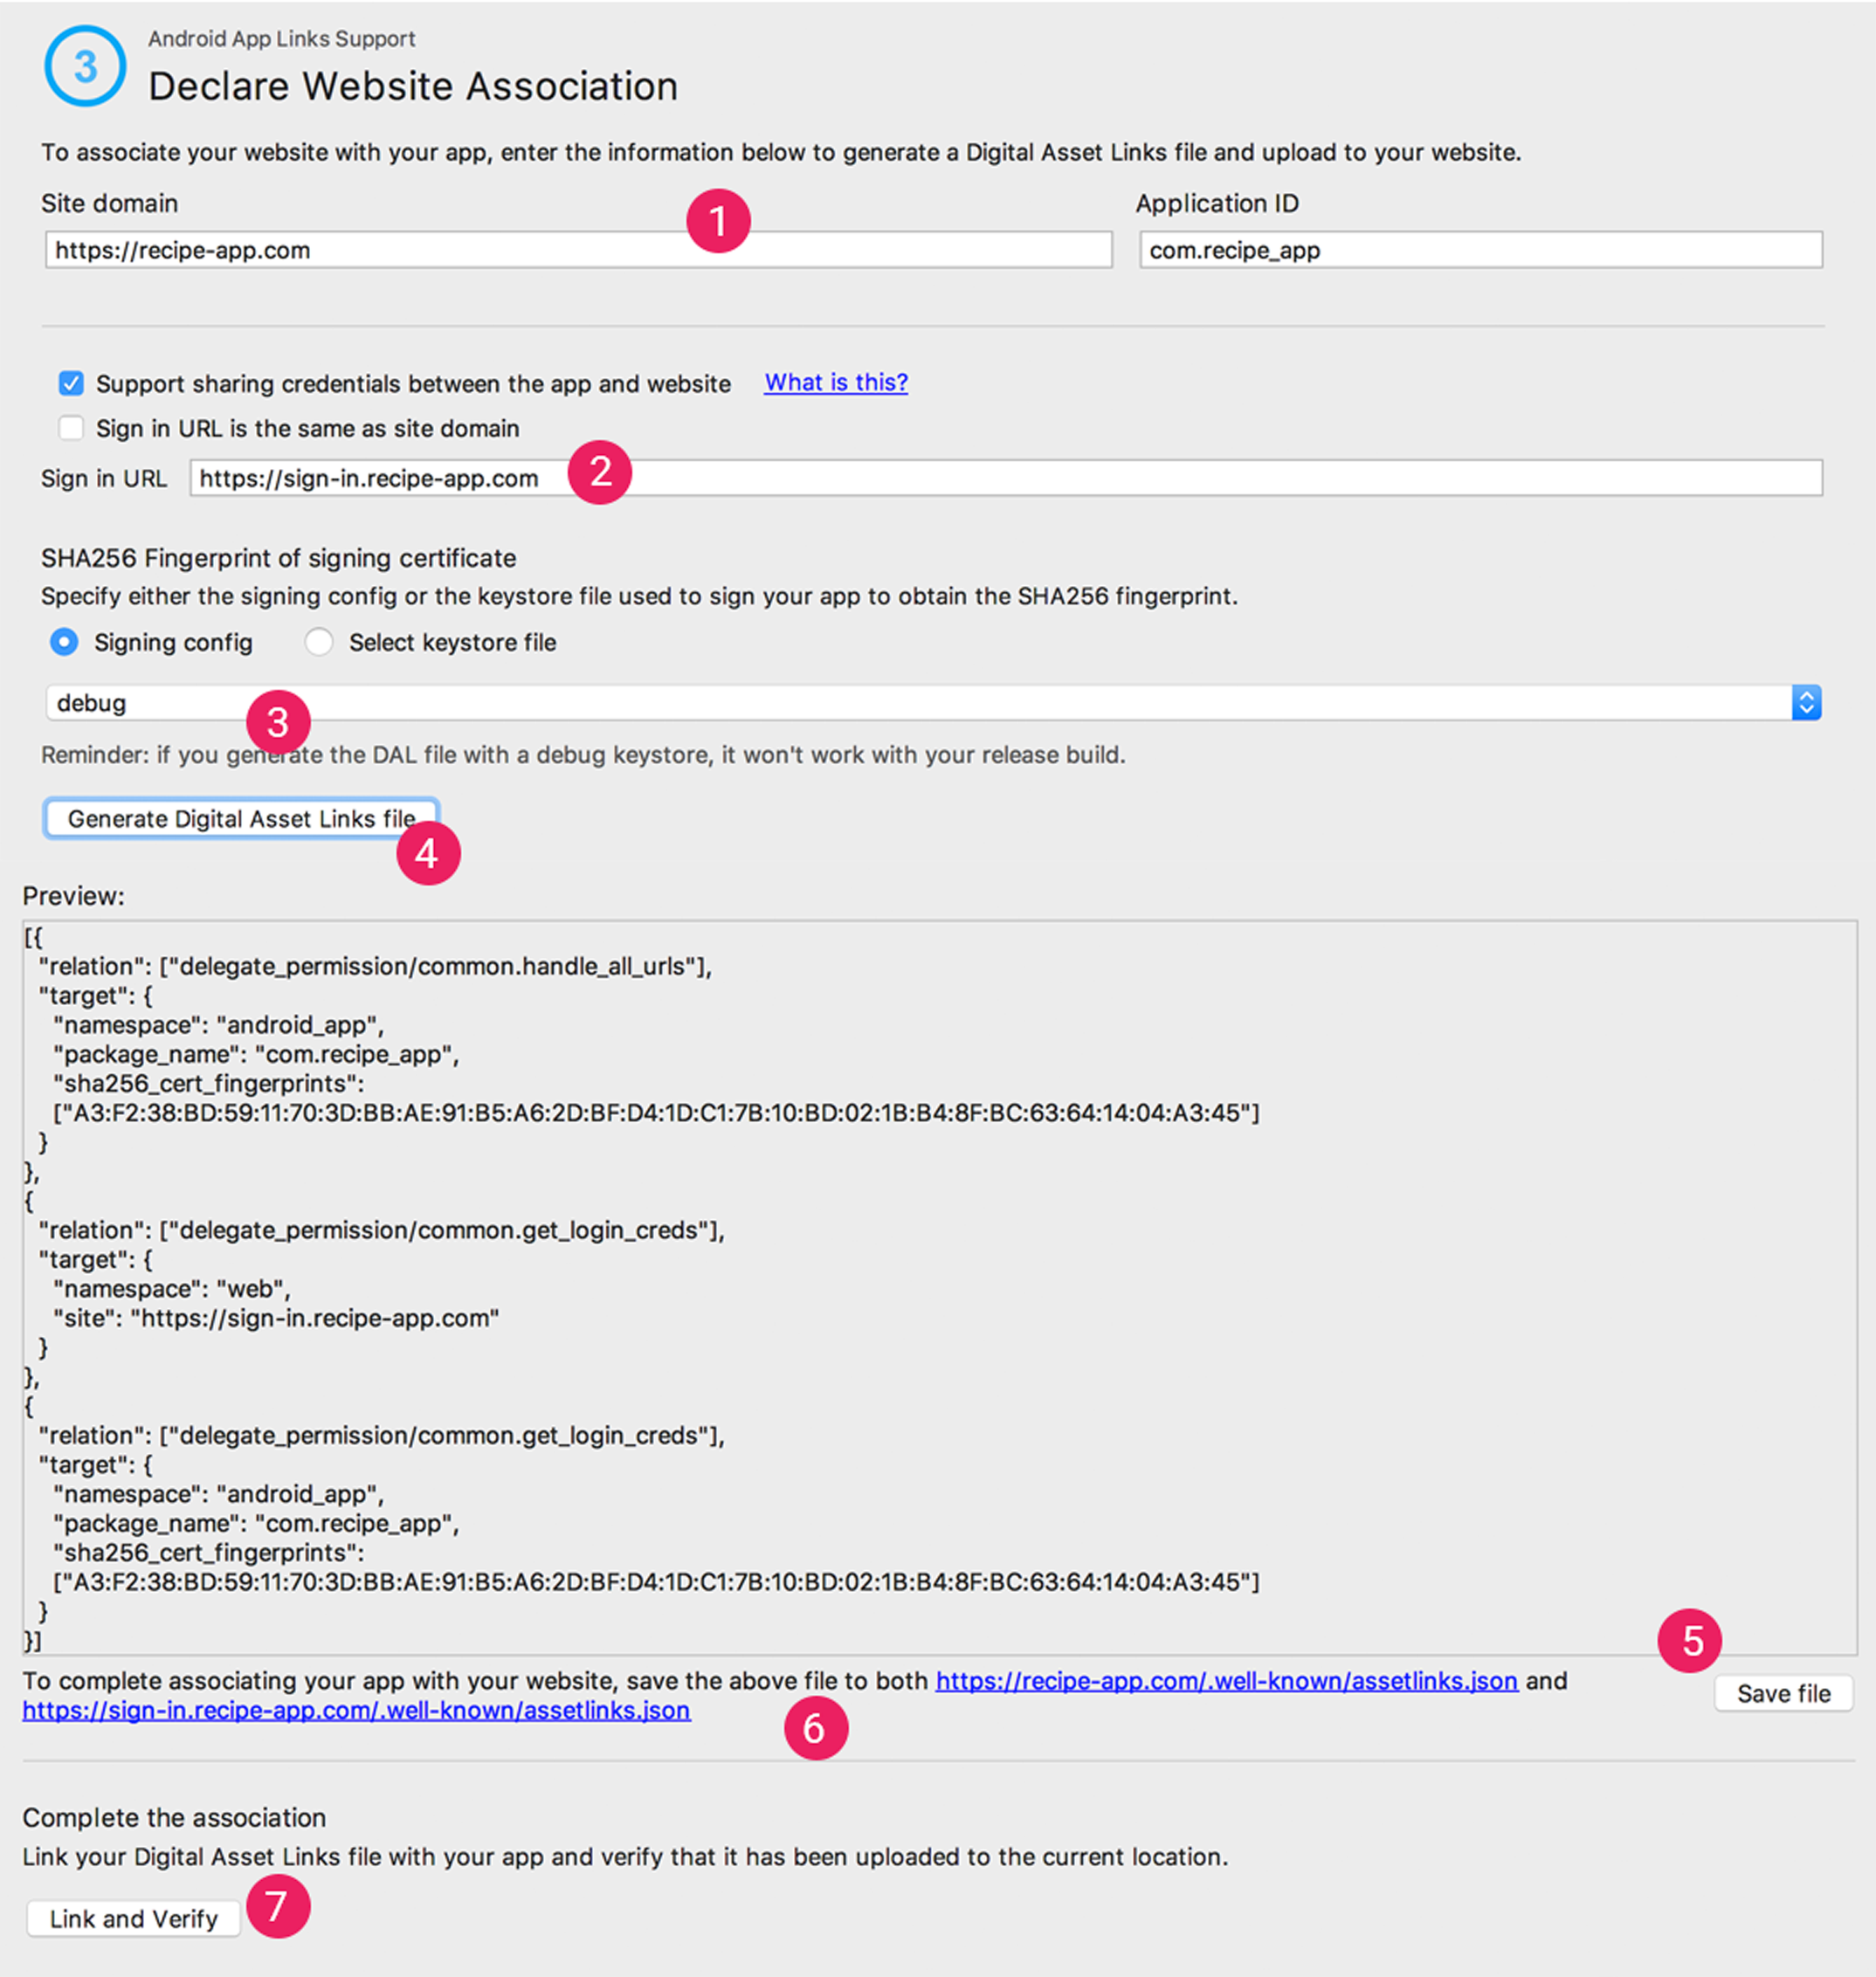
To associate your app and your website using the App Links Assistant, click Open Digital Asset Links File Generator from the App Links Assistant and follow these steps:
Figure 2. Enter details about your site and app to generate a Digital Asset Links file.
-
Enter your Site domain and your Application ID.
-
To include support in your Digital Asset Links file for One Tap sign-in, select Support sharing credentials between the app and the website and enter your site's sign-in URL.This adds the following string to your Digital Asset Links file declaring that your app and website share sign-in credentials:
delegate_permission/common.get_login_creds. -
Specify the signing config or select a keystore file.
Make sure you select the right release config or keystore file for the release build or the debug config or keystore file for the debug build of your app. If you want to set up your production build, use the release config. If you want to test your build, use the debug config.
- Click Generate Digital Asset Links file.
- Once Android Studio generates the file, click Save file to download it.
- Upload the
assetlinks.jsonfile to your site, with read access for everyone, athttps://yoursite/.well-known/assetlinks.json.
[!CAUTION]
The system verifies the Digital Asset Links file via the encrypted HTTPS protocol. Make sure that the assetlinks.json file is accessible over an HTTPS connection, regardless of whether your app's intent filter includes https.
- Click Link and Verify to confirm that you've uploaded the correct Digital Asset Links file to the correct location.
Learn more about associating your website with your app through the Digital Asset Links file in Declare website associations.
-
To integrate deeplink support in iOS you need:
-
Follow how to set up applink in the official documentation.
-
Associate your app with your website. Supporting associated domains
-
Add key
com.apple.developer.associated-domainstoInfo.plist
Example: https://YOUR_DOMAIN
Example: https://mydomain.com
<key>com.apple.developer.associated-domains</key>
<array>
    <string>applinks:YOUR_DOMAIN</string>
</array>Note
Requires Affise Status Module
Use the next public method of SDK to get deferred deeplink from server
Affise.getDeferredDeeplink((deferredDeeplink) => {
    // handle deferred deeplink
});Note
Requires Affise Status Module
Use the next public method of SDK to get deferred deeplink value from server
Affise.getDeferredDeeplinkValue(ReferrerKey.CLICK_ID, (deferredDeeplinkValue) => {
    // handle deferred deeplink value
})In some scenarios you would want to limit Affise network usage, to pause that activity call anywhere in your application following code after Affise start:
Affise.settings({affiseAppId, secretKey}).start(); // Start Affise SDK
Affise.setOfflineModeEnabled(true); // to enable offline mode
Affise.setOfflineModeEnabled(false); // to disable offline mode
While offline mode is enabled, your metrics and other events are kept locally, and will be delivered once offline mode is disabled. Offline mode is persistent as Application lifecycle, and will be disabled with process termination automatically. To check current offline mode status call:
Affise.isOfflineModeEnabled().then((enabled) => {
    // returns true or false describing current offline Mode state
});To disable any tracking activity, storing events and gathering device identifiers and metrics call anywhere in your application following code after Affise start:
Affise.settings({affiseAppId, secretKey}).start(); // Start Affise SDK
Affise.setTrackingEnabled(true); // to enable tracking
Affise.setTrackingEnabled(false); // to disable tracking
By default, tracking is enabled.
While tracking mode is disabled, metrics and other identifiers is not generated locally. Keep in mind that this flag is persistent until app reinstall, and don't forget to reactivate tracking when needed. To check current status of tracking call:
Affise.isTrackingEnabled().then((enabled) => {
  // returns true or false describing current tracking state
});To disable any background tracking activity, storing events and gathering device identifiers and metrics call anywhere in your application following code after Affise start:
Affise.settings({affiseAppId, secretKey}).start(); // Start Affise SDK
Affise.setBackgroundTrackingEnabled(true); // to enable background tracking
Affise.setBackgroundTrackingEnabled(false); // to disable background tracking
By default, background tracking is enabled.
While background tracking mode is disabled, metrics and other identifiers is not generated locally. Background tracking mode is persistent as Application lifecycle, and will be re-enabled with process termination automatically. To check current status of background tracking call:
Affise.isBackgroundTrackingEnabled().then((enabled) => {
  // returns true or false describing current background tracking state
});Affise.getRandomUserId();Note
To make device id more persistent on application reinstall
use Affise Persistent Module for iOS
use Affise AndroidId Module for Android
Note
Read more about Persistent data and Reinstall tracking
Affise.getRandomDeviceId();Returns providers map with ProviderType as key
As Promise:
Affise.getProviders().then((providers) => {
    const key = ProviderType.AFFISE_APP_TOKEN;
    const value = providers[key];
    // handle provider value
});
As async / await:
const fetchData = async () => {
    const providers = await Affise.getProviders();
    const key = ProviderType.AFFISE_APP_TOKEN;
    const value = providers[key];
    // handle provider value
};

fetchData()
.catch(console.error);Affise.isFirstRun().then((isFirstRun) => {
// handle
});Use the next public method of SDK
To get Install referrer by installing from
AndroidRuStoreinclude moduleRuStore
To get Install referrer by installing from
AndroidAppGalleryinclude moduleHuawei
Affise.getReferrerUrl().then((referrer) => {
  // handle referrer
});Use the next public method of SDK to get referrer value by
To get Install referrer by installing from
AndroidRuStoreinclude moduleRuStore
To get Install referrer by installing from
AndroidAppGalleryinclude moduleHuawei
Affise.getReferrerUrlValue(ReferrerKey.CLICK_ID, (value) => {
  // handle referrer
})In examples above ReferrerKey.CLICK_ID is used, but many others is available:
AD_IDCAMPAIGN_IDCLICK_IDAFFISE_ADAFFISE_AD_IDAFFISE_AD_TYPEAFFISE_ADSETAFFISE_ADSET_IDAFFISE_AFFC_IDAFFISE_CHANNELAFFISE_CLICK_LOOK_BACKAFFISE_COST_CURRENCYAFFISE_COST_MODELAFFISE_COST_VALUEAFFISE_DEEPLINKAFFISE_KEYWORDSAFFISE_MEDIA_TYPEAFFISE_MODELAFFISE_OSAFFISE_PARTNERAFFISE_REFAFFISE_SITE_IDAFFISE_SUB_SITE_IDAFFISE_SUB_1AFFISE_SUB_2AFFISE_SUB_3AFFISE_SUB_4AFFISE_SUB_5AFFCPIDSUB_1SUB_2SUB_3SUB_4SUB_5
Caution
🟥🟥🟥🟥🟥🟥🟥🟥🟥🟥🟥🟥🟥🟥🟥
If getStatus return an error or working more than 2 minutes
Please see section validation credentials
🟥🟥🟥🟥🟥🟥🟥🟥🟥🟥🟥🟥🟥🟥🟥
Affise.module.getStatus(AffiseModules.STATUS, (response) => {
    // handle status response
});
Android Only
Under the EU's General Data Protection Regulation (GDPR): An individual has the right to have their personal data erased. To provide this functionality to user, as the app developer, you can call
Affise.settings({affiseAppId, secretKey}).start(); // Start Affise SDK
Affise.android.forget(); // to forget users data
After processing such request our backend servers will delete all user's data. To prevent library from generating new events, disable tracking just before calling Affise.forget:
Affise.settings({affiseAppId, secretKey}).start(); // Start Affise SDK
Affise.setTrackingEnabled(false);
Affise.android.forget(); // to forget users data
iOS Only
For ios prior 16.1 first call
Affise.ios.registerAppForAdNetworkAttribution((error) => {
  // Handle error
});
Updates the fine and coarse conversion values, and calls a completion handler if the update fails. Second argument coarseValue is available in iOS 16.1+
Affise.ios.updatePostbackConversionValue(1n, SKAdNetwork.CoarseConversionValue.medium, (error) => {
  // Handle error
});
Configure your app to send postback copies to Affise:
Add key NSAdvertisingAttributionReportEndpoint to Info.plist
Set key value to https://affise-skadnetwork.com/
Example: example/ios/AffiseAttributionLibExample/Info.plist
<key>CFBundleURLTypes</key>
<array>
    <dict>
      <key>NSAdvertisingAttributionReportEndpoint</key>
      <string>https://affise-skadnetwork.com/</string>
    </dict>
</array>// Send AdRevenue info
new AffiseAdRevenue(AffiseAdSource.ADMOB)
.setRevenue(2.5, "ImpressionData_Currency")
.setNetwork("ImpressionData_Network")
.setUnit("ImpressionData_Unit")
.setPlacement("ImpressionData_Placement")
.send();Caution
🟥🟥🟥🟥🟥🟥🟥🟥🟥🟥🟥🟥🟥🟥🟥
Debug methods WON'T work on Production
🟥🟥🟥🟥🟥🟥🟥🟥🟥🟥🟥🟥🟥🟥🟥
Validate your credentials by receiving ValidationStatus values:
VALID- your credentials are validINVALID_APP_ID- your app id is not validINVALID_SECRET_KEY- your SDK secretKey is not validPACKAGE_NAME_NOT_FOUND- your application package name not foundNOT_WORKING_ON_PRODUCTION- you using debug method on productionNETWORK_ERROR- network or server not available (for exampleAiroplane modeis active)
Affise
    .settings({
        affiseAppId: 'Your appId',
        secretKey: 'Your SDK secretKey',
    })
    .setProduction(false) //To enable debug methods set Production to false
    .start(); // Start Affise SDK

Affise.debug.validate((status) =>
{
    // Handle validation status
});Get Affise flutter library version
Affise.debug.version()Get Affise native Android/iOS library version
Affise.debug.versionNative().then((version) => {
  // Native version
});Caution
🟥🟥🟥🟥🟥🟥🟥🟥🟥🟥🟥🟥🟥🟥🟥
If Affise settings doesn't change after version update or api is working incorrectly.
First: try reset cache for React Native. npm start -- --reset-cache or npm cache clean --force
Second: completely stop application on device and stop React Native Metro server
React Native relaunch JavaScript/TypeScript on live code change,
but native code (such as Affise native library) won't restart
unless Android application is manually restarted or completely rebuild
🟥🟥🟥🟥🟥🟥🟥🟥🟥🟥🟥🟥🟥🟥🟥
Note
🟥🟥🟥🟥🟥🟥🟥🟥🟥🟥🟥🟥🟥🟥🟥
Then reporting a BUG
Please provide information:
-
From command
npx react-native doctor -
From command
npx react-native info -
On which platform bug occurred
iOSorAndroid -
Detailed log of a bug
-
Steps to reproduse a bug
-
Code which cause a bug
🟥🟥🟥🟥🟥🟥🟥🟥🟥🟥🟥🟥🟥🟥🟥
Caution
🟥🟥🟥🟥🟥🟥🟥🟥🟥🟥🟥🟥🟥🟥🟥
This app has crashed because Affise Advertising Module is attempted to access privacy-sensitive data without a usage description.
The app's Info.plist must contain an NSUserTrackingUsageDescription key with a string value explaining
to the user how the app uses this data.
🟥🟥🟥🟥🟥🟥🟥🟥🟥🟥🟥🟥🟥🟥🟥
Open info.plist and add key NSUserTrackingUsageDescription with string value. For more information read requirements